Water Heater Expansion Tank: Do You Need One?
Expansion tanks prevent pressure damage in closed plumbing systems. Find out if your home needs one and how to install it.
Safety Disclaimer
Water heater maintenance involves working with pressurized systems, scalding hot water, and potentially hazardous electrical or gas connections. Always shut off power (electric heaters) or gas supply (gas heaters) and allow water to cool to a safe temperature before beginning any maintenance. Wear appropriate safety equipment including gloves and eye protection. If you're uncomfortable with any step, contact a licensed plumber.
Water expands when it heats up. That is basic physics that most people learned in school and then never thought about again. But if you own a water heater and your home has a closed plumbing system, that expansion creates a real problem that can damage pipes, wear out valves, and stress your water heater tank.
An expansion tank solves this problem for about $50 to $100. Whether you actually need one depends entirely on how your plumbing is configured. Here is how to figure that out, and how to install one if you do.
The Physics: Why Thermal Expansion Matters
When water in your 50-gallon water heater is heated from the incoming temperature (around 50 to 60 degrees F) to 120 degrees F, it expands by approximately 2 percent. That is roughly one gallon of extra volume. That expanded water has to go somewhere.
In an open plumbing system, no problem. The extra volume pushes backward through the cold water line into the municipal supply. The city’s water main absorbs the pressure without anyone noticing.
But if your system is closed (and an increasing number of homes are), that expanded water is trapped. Pressure builds inside the plumbing with every heating cycle.
Open vs. Closed Systems: How to Tell
Open System
In an open system, water can flow freely back into the municipal supply line when pressure builds inside the house. These homes do not need an expansion tank.
How to identify: Your main water line enters the house and connects directly to the plumbing without any check valve, backflow preventer, or pressure-reducing valve (PRV) between the meter and the house plumbing.
Closed System
In a closed system, a device on the main water line prevents water from flowing backward into the supply. These homes need an expansion tank.
Devices that create a closed system:
- Backflow preventer (required by many municipalities to protect the public water supply)
- Check valve on the main line
- Pressure-reducing valve (most PRVs include a built-in check valve)
How to check: Find where the main water line enters your house. Look for a brass or bronze device with arrows on it between the meter and the first branch in your plumbing. If you see one, you likely have a closed system.
Not sure? Call your water utility. They can tell you whether your area requires backflow prevention. You can also ask a plumber during your next service call.
What Happens Without an Expansion Tank
In a closed system without an expansion tank, here is what thermal expansion does:
Short-Term Effects
-
T&P valve discharge. The temperature and pressure relief valve on your water heater may open when pressure exceeds 150 PSI, releasing water onto the floor. This is the valve doing its job, but it should not be a regular occurrence. If your T&P valve is dripping or discharging periodically, check whether you need an expansion tank before replacing the valve.
-
Toilet fill valves dripping. Excess pressure forces water past the fill valve seal. If your toilets drip into the bowl between flushes, pressure may be the cause.
Long-Term Effects
-
Premature water heater failure. Repeated pressure cycling stresses the tank walls and fittings. A tank under chronic overpressure ages faster.
-
Fitting and valve failures. Compression fittings, supply line connections, and appliance valves (washing machine, dishwasher, ice maker) are rated for normal pressure. Chronic overpressure fatigues these connections.
-
Water hammer. High system pressure amplifies the shock wave when valves close. You may hear banging sounds in the pipes when appliances cycle.
For more on T&P valve issues, see our water heater safety guide.
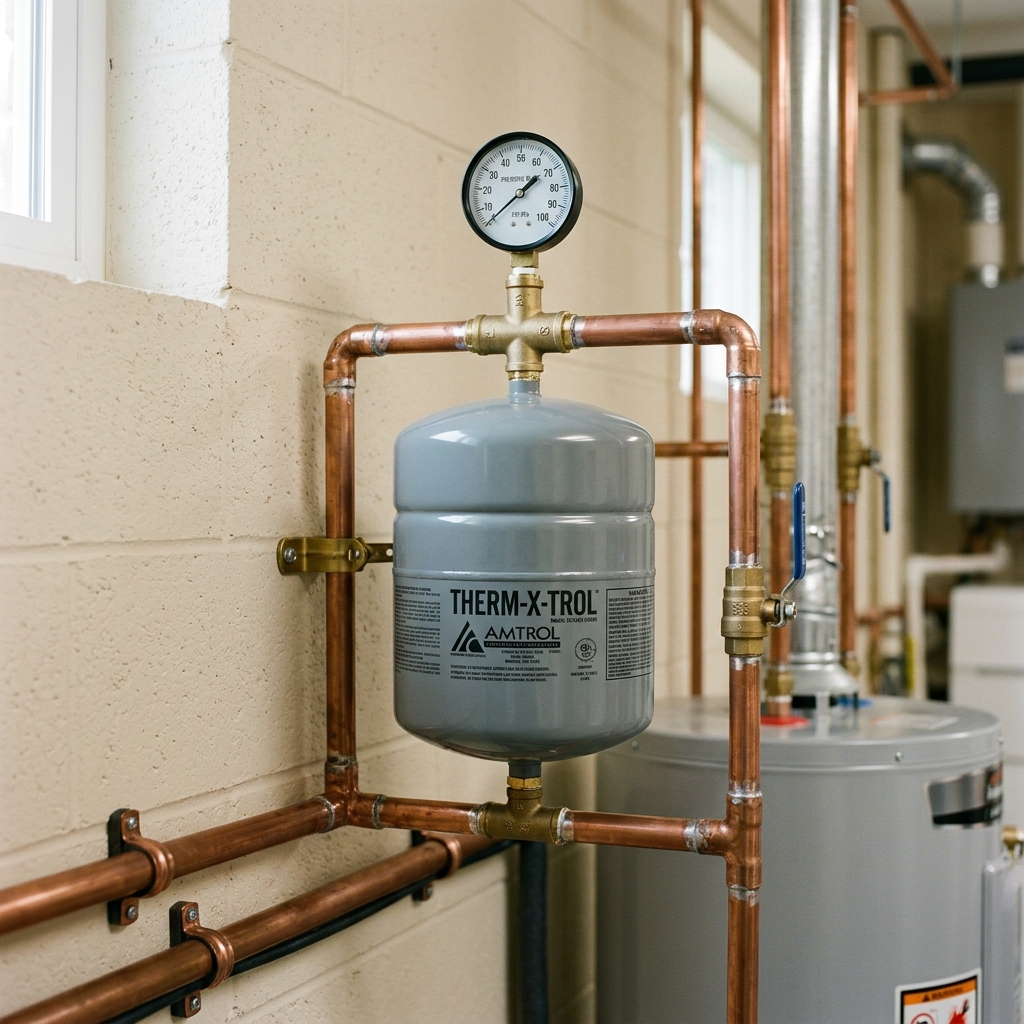
How an Expansion Tank Works
An expansion tank is a small pressurized vessel (typically 2 to 5 gallons) installed on the cold water line near the water heater. Inside the tank, a rubber diaphragm separates two chambers:
- Air side (top): Pre-charged with air pressure matching your home’s water pressure
- Water side (bottom): Connected to the plumbing system
When the water heater fires and water expands, the extra volume pushes into the expansion tank’s water side, compressing the air cushion above the diaphragm. When hot water is drawn and pressure drops, the compressed air pushes the water back into the system.
The tank acts as a shock absorber for thermal expansion. Simple, passive, no moving parts beyond the diaphragm.
Is an Expansion Tank Required by Code?
Yes, in most jurisdictions. Both the International Residential Code (IRC) and the Uniform Plumbing Code (UPC) require an expansion tank on any water heater installed in a closed plumbing system. Many building inspectors will not pass a water heater installation without one.
Even if your local code does not mandate it, installing one is cheap insurance against pressure damage. The $50 to $100 cost of the tank is nothing compared to a failed water heater or burst fitting.
Choosing the Right Size
Expansion tanks come in several sizes. The correct size depends on your water heater capacity and incoming water pressure:
| Water Heater Size | Water Pressure | Recommended Tank Size |
|---|---|---|
| 40 - 50 gallons | 40 - 60 PSI | 2 gallons |
| 40 - 50 gallons | 60 - 80 PSI | 4.5 gallons |
| 60 - 80 gallons | 40 - 60 PSI | 4.5 gallons |
| 60 - 80 gallons | 60 - 80 PSI | 5 gallons |
Check your water pressure with a pressure gauge attached to a hose bib. Normal residential pressure should be between 40 and 80 PSI. If it is above 80 PSI, you need a pressure-reducing valve in addition to the expansion tank.
A reliable choice for most homes is the Watts PLT-5 Expansion Tank, which handles water heaters up to 50 gallons at pressures up to 80 PSI.
How to Install an Expansion Tank
Tools Needed
- Adjustable wrench or pipe wrench
- Teflon tape
- 3/4-inch tee fitting (if not already present)
- Expansion tank mounting bracket or strap
- Tire pressure gauge or digital gauge
- Bicycle pump or small compressor
Step 1: Set the Pre-Charge Pressure
Before installing, the air chamber in the expansion tank must be set to match your home’s water pressure.
- Check your water pressure with a gauge on a hose bib. Note the reading.
- Use the Schrader valve on top of the expansion tank (it looks like a tire valve) to check the factory pre-charge. Most ship at 40 PSI.
- Use a bicycle pump or small compressor to adjust the air pressure to match your water pressure reading exactly.
This step is critical. If the pre-charge is too low, the tank fills with water and offers no cushion. If it is too high, it prevents water from entering the tank at all.
Step 2: Install the Tee Fitting
The expansion tank connects to the cold water line above the water heater. If there is no existing tee fitting:
- Turn off the water supply and drain a few gallons from the heater.
- Cut into the cold water line above the heater and install a 3/4-inch tee fitting.
- One branch continues to the water heater. The other branch accepts the expansion tank.
Step 3: Mount the Tank
Thread the expansion tank into the tee fitting. Wrap the threads with Teflon tape first.
Mounting position: Install vertically with the water connection on the bottom. This orientation puts the air on top, which gives the diaphragm the longest life. Many manufacturers require vertical installation for warranty coverage.
Support the tank. A 2-gallon expansion tank full of water weighs about 16 pounds. Over time, the weight on the threaded connection can cause stress cracks. Use a mounting bracket or plumber’s strap to support the tank independently of the plumbing connection.
Step 4: Restore Service
- Turn the water supply back on.
- Open a hot faucet and let it run until air clears from the lines.
- Check all connections for leaks.
- Verify operation: the next time the water heater fires, you should not see any discharge from the T&P valve.
Maintenance and Replacement
Expansion tanks are not set-and-forget. Check yours annually:
-
Tap test: Tap the side of the tank with your knuckle. The air side (top) should sound hollow. The water side (bottom) should sound solid. If the entire tank sounds solid, the diaphragm has failed and the tank is waterlogged.
-
Schrader valve test: Press the pin in the Schrader valve on top briefly. Air should come out. If water comes out, the diaphragm has ruptured. Replace the tank.
-
Pressure check: Use a tire gauge on the Schrader valve. The reading should match your water pressure. If it has dropped significantly, recharge with a pump.
Most expansion tanks last 5 to 10 years. When the diaphragm fails, replace the entire tank. They are not field-serviceable.
Troubleshooting
| Problem | Likely Cause | Fix |
|---|---|---|
| T&P valve still drips after installing expansion tank | Pre-charge pressure does not match water pressure | Adjust air charge to match water pressure |
| Tank feels completely full of water | Diaphragm failed | Replace expansion tank |
| Water pressure in house fluctuates | Expansion tank waterlogged or undersized | Check diaphragm, consider upsizing |
| Tank leaks at connection | Loose fitting or damaged threads | Tighten or reinstall with new Teflon tape |
Related Guides
- Water Heater Safety Guide, T&P valve testing and pressure safety
- How to Drain a Hot Water Heater, Annual maintenance guide
- Annual Water Heater Maintenance Checklist, Complete yearly service list
- How Long Do Water Heaters Last?, Factors that affect lifespan
- Water Heater Temperature Settings, Optimal temperature for safety and efficiency
Sources
- International Residential Code (IRC), Section P2903.4, Thermal expansion requirements
- Watts Water Technologies, Expansion Tank Sizing, Manufacturer sizing charts and installation guides
- U.S. Department of Energy, Water Heating, Water heater efficiency and maintenance