How to Insulate a Water Heater to Save Energy
A water heater blanket can cut standby heat loss by 25-45%. Here is how to install one safely in under an hour.
Safety Disclaimer
Water heater maintenance involves working with pressurized systems, scalding hot water, and potentially hazardous electrical or gas connections. Always shut off power (electric heaters) or gas supply (gas heaters) and allow water to cool to a safe temperature before beginning any maintenance. Wear appropriate safety equipment including gloves and eye protection. If you're uncomfortable with any step, contact a licensed plumber.
Most water heaters sit in a garage, basement, or utility closet, radiating heat into air that nobody is trying to warm. That lost heat is wasted energy. You are paying to heat water, and then a portion of that heat escapes through the tank walls into the surrounding space before you ever turn on a faucet.
An insulation blanket wraps around the tank and reduces this standby heat loss. It is one of the cheapest and fastest energy upgrades you can do, and the payback period is under a year.
Does Your Water Heater Need Insulation?
Not every water heater benefits equally from a blanket. Here is how to tell:
The Touch Test
Place your hand flat on the side of your water heater tank (carefully, in case it is hot). If the outer shell feels warm to the touch, heat is escaping and insulation will help. If the shell feels cool or room temperature, the built-in insulation is already doing a good job, and a blanket will provide only a marginal improvement.
Check the R-Value
Look at the energy label on your water heater. The built-in insulation R-value tells you how well the tank retains heat:
| Built-in R-Value | Blanket Benefit |
|---|---|
| R-6 to R-8 (older units, pre-2005) | High - blanket strongly recommended |
| R-8 to R-12 (2005-2015 units) | Moderate - blanket recommended |
| R-12 to R-16 (2015+ units) | Low - blanket optional |
| R-16+ (some premium models) | Minimal - likely not worth the effort |
The U.S. Department of Energy recommends insulation blankets for tanks with a built-in R-value below R-24. Since almost no residential water heater ships at R-24, the majority of homes can benefit.
Location Matters
Where your water heater sits makes a difference. A tank in an unheated garage loses significantly more heat to the cold surroundings than one in a climate-controlled utility room. Insulation provides the greatest savings when:
- The heater is in an unheated garage, basement, or crawl space
- The ambient temperature around the heater regularly drops below 60 degrees F
- The heater is in a drafty area with air movement across the tank surface
What You Will Need
| Item | Purpose | Cost |
|---|---|---|
| Insulation blanket kit (R-6.7 to R-10) | Wraps the tank | $20 - $35 |
| Utility knife or scissors | Cuts insulation to fit | Already owned |
| Measuring tape | Measures tank dimensions | Already owned |
| Duct tape or foil tape | Secures blanket edges | $5 - $8 |
| Marker | Marks cutout locations | Already owned |
| Pipe insulation sleeves | Insulates connecting pipes | $3 - $10 |
A solid blanket choice is the Frost King Water Heater Insulation Blanket, which fits tanks up to 60 gallons and provides R-10 insulation. For pipe insulation, foam pipe sleeves in 3/4-inch diameter cover most residential water lines.
Safety Rules Before You Start
Insulation blankets are safe when installed correctly. But covering the wrong components can create serious hazards. Follow these rules:
For gas water heaters:
- Never cover the top of the tank. The flue pipe and draft hood must remain completely exposed.
- Do not cover the gas control valve or thermostat at the bottom of the tank.
- Keep insulation at least 2 inches away from the combustion air intake at the base.
- Do not block the T&P relief valve or its discharge pipe.
- Do not cover the burner access panel at the bottom.
For electric water heaters:
- Do not cover the thermostat access panels. You need to reach these for adjustments.
- Keep insulation away from the T&P relief valve and discharge pipe.
- You can cover the top of an electric water heater (no flue to worry about), but leave room around the electrical junction box.
Both types:
- Never use insulation material with a backing that can melt or catch fire near heat sources.
- Do not compress the blanket. Compressed insulation loses its R-value.
Step-by-Step Installation
Step 1: Measure Your Tank
Measure the height and circumference of your water heater. Most standard residential tanks are 48 to 60 inches tall and 56 to 70 inches in circumference (18 to 22 inches in diameter).
Most blanket kits come in a one-size-fits-most sheet that you trim to fit. If your tank is unusually large (75+ gallons), you may need an oversized kit.
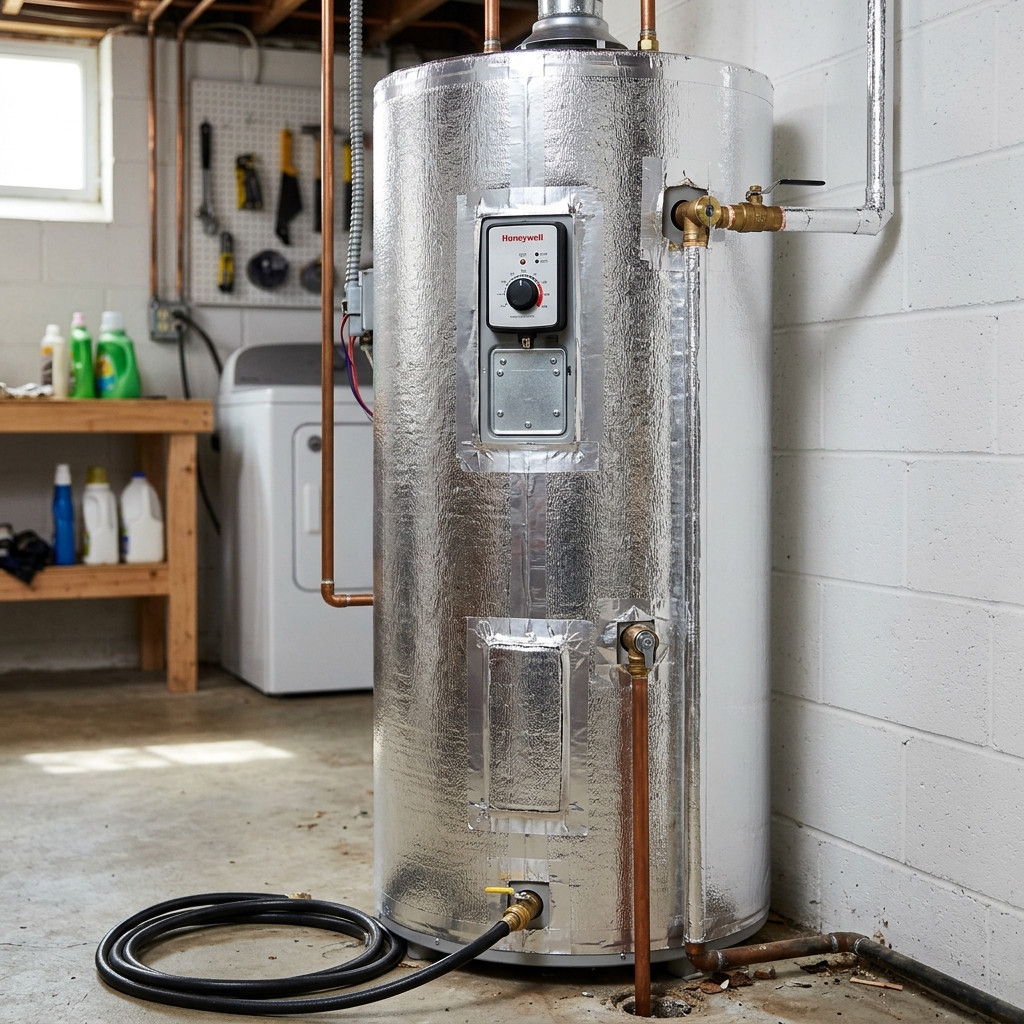
Step 2: Stand the Blanket Against the Tank
Unroll the blanket and wrap it around the tank. The foil or vinyl side faces outward. Position the blanket so the top edge sits at or slightly below the top of the tank.
For gas water heaters: Position the bottom edge at least 2 inches above the gas control valve and burner area. The insulation should not extend to the floor.
For electric water heaters: You can extend the blanket to within an inch of the bottom and include the top.
Step 3: Mark and Cut Openings
With the blanket held against the tank, use a marker to trace outlines around:
- T&P relief valve and discharge pipe
- Thermostat access panels (electric)
- Pipe connections at the top
- Gas control valve and pilot light area (gas)
- Electrical junction box (electric)
- Any labels or stickers you want to keep visible (data plate, relighting instructions)
Remove the blanket and cut out the marked areas with a utility knife. Cut the holes 1 to 2 inches larger than the component to ensure clearance.
Step 4: Secure the Blanket
Wrap the blanket around the tank and secure it with the tape or straps included in the kit. Most kits include adhesive tabs or elastic straps.
- Tape the vertical seam where the blanket edges meet
- Tape the top and bottom edges to prevent the blanket from sliding down
- Do not tape over any cutouts or safety components
Step 5: Insulate the Pipes
While you have the insulation materials out, insulate the first 3 to 5 feet of the hot water outlet pipe and the cold water inlet pipe. Slip the foam pipe sleeves over the pipes and secure with tape at the joints.
Insulating the hot water pipe prevents heat loss as hot water travels to your fixtures. Insulating the cold water pipe near the heater reduces condensation and slows heat conduction from the tank backward through the cold pipe.
Step 6: Check Your Work
After installation:
- Turn on the water heater and let it run through a full cycle.
- Check that the blanket has not shifted or sagged over the combustion area (gas) or thermostat panels (electric).
- Verify the T&P valve is accessible and the discharge pipe is clear.
- Feel the outside of the blanket. It should be noticeably cooler than the bare tank was before insulation.
Additional Energy-Saving Tips
Since you are already in energy-saving mode, here are more steps that complement the insulation blanket:
Lower the Thermostat
If your water heater is set above 120 degrees F, you are losing extra heat and spending extra money. Lowering from 140 to 120 degrees can reduce water heating costs by 6 to 10 percent. See our temperature settings guide for instructions.
Fix Sediment Buildup
A layer of sediment at the bottom of the tank forces the burner or element to work harder. Annual flushing removes sediment and restores efficiency. Combined with insulation, the savings add up.
Install Heat Traps
Heat traps are small valves or loops in the pipes directly above the water heater that prevent convective heat loss (hot water naturally rising up out of the tank through the pipes). Most heaters installed after 2000 have built-in heat traps. If yours does not, adding them is a simple retrofit.
Use a Timer (Electric Heaters)
An electric water heater timer can shut off the unit during hours when nobody uses hot water (overnight, during work hours). A basic timer costs $30 to $60 and can save an additional $25 to $50 per year. This works best for households with predictable schedules.
Expected Savings
Here is what to expect from insulation in combination with other efficiency measures:
| Measure | Annual Savings | Cost | Payback Period |
|---|---|---|---|
| Insulation blanket | $20 - $45 | $20 - $35 | 6 - 12 months |
| Lower thermostat to 120°F | $30 - $60 | Free | Immediate |
| Pipe insulation (first 5 ft) | $8 - $12 | $5 - $10 | Under 1 year |
| Annual flushing | $15 - $30 (efficiency gain) | Free (DIY) | Immediate |
| Timer (electric only) | $25 - $50 | $30 - $60 | 1 - 2 years |
Combined, these measures can reduce water heating costs by 25 to 40 percent. None of them require a plumber or specialized tools.
When Insulation Is Not Worth It
Skip the blanket if:
- Your water heater has R-16 or higher built-in insulation and sits in a heated space
- The tank exterior feels cool to the touch
- Your heater is a heat pump model (the blanket interferes with the heat pump’s ability to pull warmth from the surrounding air)
- Your heater is a tankless unit (no tank to insulate)
Related Guides
- Water Heater Temperature Settings, Optimal temperature for savings and safety
- How to Flush a Water Heater, Clear sediment for better efficiency
- Annual Water Heater Maintenance Checklist, Complete yearly service list
- How Long Do Water Heaters Last?, How efficiency maintenance extends lifespan
- Gas vs. Electric Maintenance, Fuel-specific care tips
Sources
- U.S. Department of Energy, Water Heater Insulation, Recommended insulation levels and savings estimates
- Energy Star, Water Heating Tips, Home efficiency improvement recommendations
- Oak Ridge National Laboratory, Building Envelope Research, Insulation R-value testing and performance data