How to Fix a Leaking Water Heater Relief Valve: Step-by-Step Guide
Is your water heater's T&P relief valve dripping or running? Learn the exact causes of a leaking relief valve—from high pressure to sediment—and follow our step-by-step guide to test, diagnose, and replace it yourself.
HowToDrainAHotWaterHeater.com
June 11, 2026
Safety Disclaimer
Water heater maintenance involves working with pressurized systems, scalding hot water, and potentially hazardous electrical or gas connections. Always shut off power (electric heaters) or gas supply (gas heaters) and allow water to cool to a safe temperature before beginning any maintenance. Wear appropriate safety equipment including gloves and eye protection. If you're uncomfortable with any step, contact a licensed plumber.
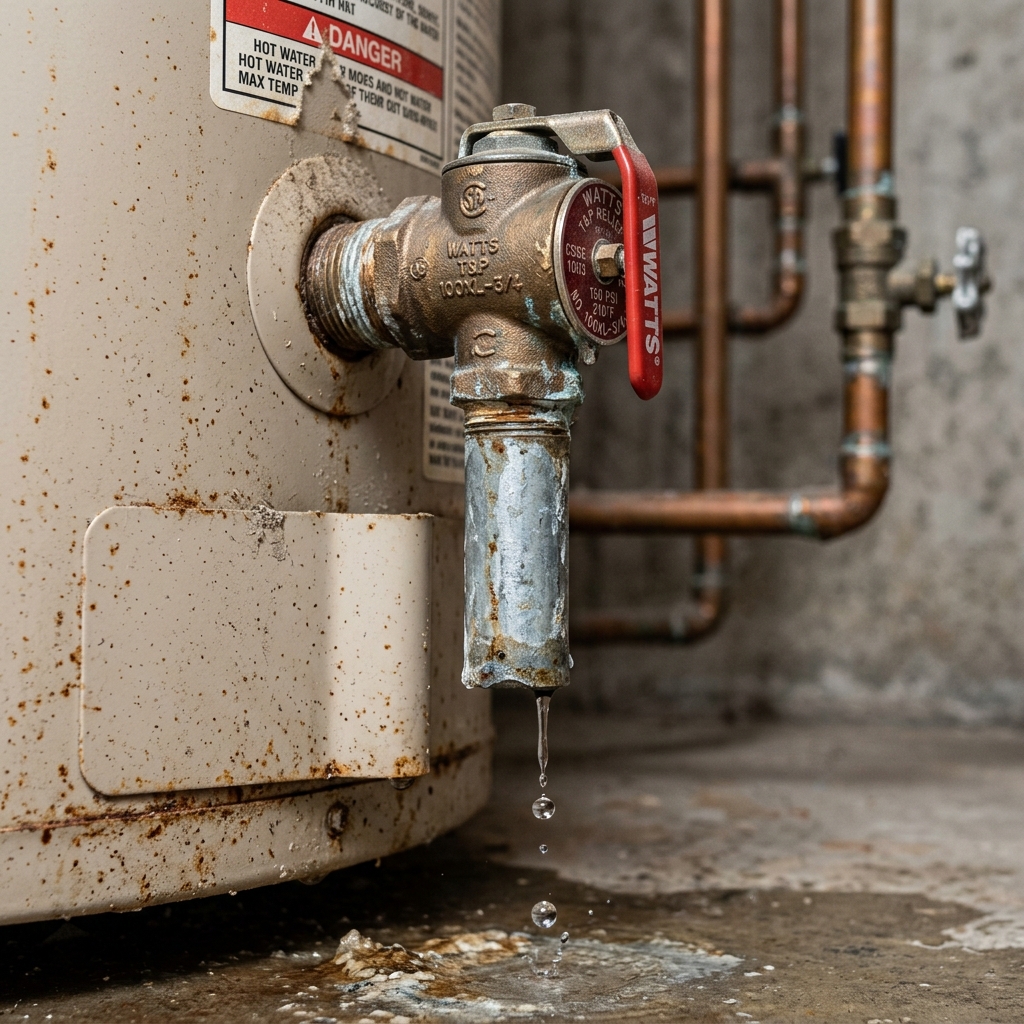
A dripping or leaking water heater temperature and pressure (T&P) relief valve is a common household plumbing issue that should never be ignored. Positioned on the top or side of your water heater tank, this critical safety device acts as the final line of defense against a catastrophic tank rupture. When functioning correctly, the T&P valve remains tightly closed, but if the pressure or temperature inside the tank climbs too high, it automatically opens to release water and relieve steam.
If you spot water pooling under the discharge tube or notice a steady drip from the valve body, it means the system is attempting to tell you something. Either the valve itself has failed, or there is an underlying system issue—such as excessive home water pressure, thermal expansion, or dangerously high temperatures—that is forcing the valve to open.
In this comprehensive, step-by-step guide, we will break down exactly how a T&P valve works, the four primary reasons it might leak, how to diagnose the root cause of your leak, and how to safely replace the valve yourself in under an hour.
Key Takeaways
- Safety First: Never cap, plug, or obstruct the discharge tube of a T&P relief valve. Doing so disables the water heater’s primary safety mechanism and can lead to a tank explosion.
- Diagnose Before Buying: A leak does not always mean a bad valve. Check your home’s water pressure and the water heater’s temperature settings first.
- Low Cost DIY: Replacing a failed T&P valve is a straightforward DIY task. A quality replacement valve costs only $15 to $25, requiring only basic hand tools.
- Regular Testing: Homeowners should test the T&P valve at least once per year to ensure it has not seized up due to mineral deposits.
Understanding the T&P Relief Valve and How It Works
To diagnose and repair a leaking valve, it helps to understand its internal mechanics. The T&P valve features a spring-loaded probe that extends directly into the water heater tank. This probe is calibrated to react to two distinct physical thresholds:
- Pressure (typically 150 PSI): If the water pressure inside the tank exceeds 150 pounds per square inch (PSI), the pressure pushes against the internal spring, opening the valve seat.
- Temperature (typically 210°F / 99°C): If the water temperature approaches boiling, the thermal element in the probe expands, forcing the valve open to dump hot water and draw in cold water.
The valve connects to a dedicated discharge pipe (also known as a blow-off tube) that runs down the side of the tank. This tube must terminate within 6 inches of the floor or drain directly into a floor drain or drain pan. The pipe ensures that if the valve does open, the scalding hot water is directed safely downward rather than spraying outward at anyone standing nearby.
4 Common Reasons Your Relief Valve Is Leaking
Before unscrewing the valve, you must determine whether the valve is leaking because it is defective or because it is doing its job. A dripping T&P valve is usually caused by one of these four issues:
1. Excessive Water Pressure (Thermal Expansion)
In modern plumbing, many homes are equipped with a “closed system.” This occurs when a backflow preventer or pressure-reducing valve (PRV) is installed on the main water line, preventing water from flowing backward into the municipal supply.
When the water heater heats cold water, the water expands (thermal expansion). In an open system, this expanded volume pushes back out into the city main. In a closed system, the water has nowhere to go, causing pressure spikes that can easily exceed the 150 PSI limit of your T&P valve, causing it to drip.
2. High Water Temperature
If your water heater’s thermostat is malfunctioning or set too high, the water temperature can climb past the 210°F safety limit. When this happens, the thermal probe triggers, opening the valve to discharge the scalding water. This is a dangerous situation because overheating water can generate steam and high pressures that threaten the structural integrity of the tank.
3. Sediment and Mineral Buildup
Over time, minerals like calcium and magnesium settle out of municipal water and form scale inside the tank. If you test your T&P valve or if it opens slightly, sediment particles can get swept into the valve opening. When the valve tries to close, these hard mineral deposits get trapped between the rubber seal and the metal seat, preventing a watertight seal. This leads to a slow, persistent drip.
4. Normal Wear and Tear (Failing Valve)
Like any mechanical component exposed to hot water and metal-on-metal contact, T&P valves wear out. The internal spring can weaken over time, or the rubber gasket can harden, crack, or corrode. If the valve is more than five years old and has begun to drip, it is often simply at the end of its useful lifespan and needs to be replaced.
How to Diagnose the Leak
Use this diagnostic flow to pinpoint the exact cause of your leaking T&P valve:
Step 1: Check the Temperature
Examine the temperature setting on your water heater. It should be set between 120°F and 140°F. If the thermostat is set to the maximum, or if you suspect it is overheating, test the water temperature at a nearby faucet using a standard thermometer. Let the hot water run for a minute, then fill a cup and measure the temperature. If it reads above 140°F, turn the thermostat down. If the water continues to overheat even with the thermostat set low, you likely have a faulty thermostat or a shorted heating element (in electric water heaters).
Step 2: Measure the Water Pressure
Purchase a simple, screw-on water pressure gauge and attach it to an outdoor hose bib or the water heater’s drain valve. Turn on the faucet to read your static home water pressure.
Normal household water pressure should be between 40 and 80 PSI. If your static pressure is above 80 PSI, your home’s main Pressure Reducing Valve (PRV) may have failed, requiring replacement. If the pressure spikes only while the water heater is actively heating, you need to install or service a thermal expansion tank.
Step 3: Flush the Valve Seat
If the pressure and temperature are normal, a piece of sediment is likely stuck in the valve. Place a bucket under the discharge tube. Wearing heavy gloves and safety glasses, lift the metal test lever on the T&P valve for 2 to 3 seconds to let a blast of hot water flush out any debris. Let the lever snap shut. If the drip stops, you have successfully cleared the sediment. If the valve continues to drip, the seat is permanently damaged or the spring is worn out, meaning it is time to replace the valve.
Leak Causes, Symptoms, and Fixes Comparison
| Primary Cause | Diagnostic Symptom | Immediate Fix | Preventive Action |
|---|---|---|---|
| Defective T&P Valve | Steady drip, normal water pressure (40-80 PSI), normal temperature (120°F). | Replace the T&P valve. | Test the valve annually; soften hard water. |
| Sediment on Valve Seat | Drip starts after testing or flushing the water heater. | Lift test lever briefly to flush out sediment; replace if drip persists. | Flush the water heater tank annually to remove sediment. |
| Thermal Expansion | Intermittent dripping, pressure spikes when the heater is actively firing. | Install or replace a thermal expansion tank. | Keep expansion tank pre-charged to match main pressure. |
| Failed Main PRV | Home water pressure constantly registers above 80 PSI. | Replace the home’s main Pressure Reducing Valve. | Monitor home water pressure every few years. |
| Overheating Tank | Heavy discharge of extremely hot water, steam, or high faucet temperatures. | Lower water heater thermostat; replace faulty thermostat/element. | Keep thermostat set to 120°F-130°F. |
Step-by-Step DIY Replacement Guide
If your diagnostics point to a worn-out or defective valve, follow these step-by-step instructions to replace it.
Tools and Materials Required
Before starting, gather the following tools and materials:
- Replacement T&P Valve: Ensure you get the correct size. Most residential water heaters use a standard 3/4-inch NPT threaded connection. We recommend the Watts 3/4-Inch T&P Relief Valve, which is highly reliable and fits almost all standard residential tanks. Check the shank length of your old valve (usually 2 to 4 inches depending on tank insulation thickness) to match it.
- Pipe Wrench or Large Adjustable Wrench: A sturdy heavy-duty pipe wrench is needed to break the seal on the old valve threads.
- Teflon Tape or Pipe Joint Compound: Use high-quality Teflon tape designed for plumbing threads.
- Garden Hose: To drain water from the tank.
- Bucket & Towels: To catch drips.
- Work Gloves: To protect your hands from hot metal and water.
Step 1: Shut Off Power and Water
[!CAUTION] Safety Warning: Never work on a water heater that is powered on. Failing to shut off power can burn out heating elements (electric) or create dangerous gas leaks.
- For Electric Water Heaters: Locate your home’s main electrical panel and turn off the circuit breaker dedicated to the water heater (typically a double-pole 30-amp breaker).
- For Gas Water Heaters: Turn the control dial on the gas valve (located near the bottom of the tank) to the “PILOT” or “OFF” position.
- Shut Off Water: Locate the cold water shut-off supply valve on the pipe entering the top of the water heater. Turn the valve clockwise to shut off the cold water.
Step 2: Draining the Tank Partially
You do not need to drain the entire water heater tank to replace the T&P valve. You only need to lower the water level below the port where the valve mounts.
- Attach a standard garden hose to the drain valve at the bottom of the water heater.
- Place the other end of the hose in a floor drain, sump pump basin, or run it outside.
- Open a hot water faucet on the floor above the water heater to break the vacuum and allow water to flow freely.
- Open the drain valve on the water heater using a flathead screwdriver or by hand.
- Drain approximately 5 to 10 gallons of water. This will clear the water level below the T&P valve port. Close the drain valve and remove the hose.
Step 3: Remove the Old T&P Valve and Discharge Pipe
- If the discharge pipe is screwed directly into the old T&P valve, use your pipe wrench to unscrew it. If it is a copper pipe soldered in place, you may need to cut it with a pipe cutter, planning to reconnect it later using a compression fitting or union.
- Once the discharge pipe is disconnected, place your pipe wrench around the body of the old T&P valve.
- Turn the wrench counterclockwise (lefty-loosey) to unscrew the valve from the tank. It may require significant force, especially if the valve has been in place for years and has developed slight corrosion. Hold the top of the water heater with your other hand to stabilize it.
Step 4: Prepare and Install the New T&P Valve
- Inspect the threads inside the water heater’s port. Wipe away any old pipe dope or debris with a clean rag.
- Take the new Watts T&P Valve and wrap the male threads with 4 to 5 wraps of Teflon tape in a clockwise direction (so the tape does not unwrap as you screw the valve in). Alternatively, apply a thin layer of pipe joint compound.
- Carefully thread the new valve into the port by hand to avoid cross-threading.
- Once hand-tight, use your pipe wrench to turn the valve clockwise. Tighten it securely, ensuring that when you finish, the discharge outlet is pointing straight down toward the floor.
Step 5: Reinstall the Discharge Pipe
- Wrap the threads on the top of the discharge pipe with Teflon tape.
- Screw the discharge pipe back into the outlet of the new T&P valve. Tighten it with your wrench.
- Verify that the bottom of the discharge pipe terminates between 2 and 6 inches above the floor or drain. If it is too long, cut it back. If it is too short, install a longer section of pipe.
Step 6: Refill the Tank and Power On
Before turning the power or gas back on, the water heater tank must be completely full of water. Running an electric water heater with an empty or partially empty tank will dry-fire and destroy the upper heating element in seconds.
- Ensure the drain valve at the bottom of the tank is fully closed.
- Turn the cold water supply valve back on (counterclockwise).
- Water will begin refilling the tank. Keep the hot water faucet that you opened in Step 2 running.
- Once water flows out of the faucet in a steady stream without sputtering air, the tank is full. Turn the faucet off.
- Inspect the new T&P valve threads and the discharge pipe connection for any signs of water leaks.
- Turn the power back on: Turn on the circuit breaker (electric) or turn the gas control dial back to “ON” and relight the pilot if necessary.
Long-Term Maintenance and Prevention
To maximize the life of your new T&P valve and protect your home, establish a simple maintenance routine:
- Test the Valve Annually: Set a calendar reminder to test the T&P valve once a year using the steps outlined in the diagnosis section. Regular testing keeps the spring mechanism moving freely and prevents lime buildup.
- Keep Temperatures Moderate: Keep your water heater set to 120°F. This provides plenty of hot water for household needs, prevents scalding, saves energy, and reduces thermal stress on the valve and tank.
- Install a Thermal Expansion Tank: If your home has a closed plumbing system, installing a thermal expansion tank is the best way to protect your T&P valve and plumbing fixtures. The expansion tank absorbs the extra volume of heated water, keeping pressure fluctuations stable.
- Flush Your Tank Annually: Flushing your water heater once a year removes the abrasive sediment that can damage the T&P valve seat and corrode the tank.
Frequently Asked Questions
What happens if a T&P valve fails to open?
If a T&P valve fails to open when temperature or pressure climbs to unsafe levels, the tank has no safety release. In extreme cases, this causes the steel tank to bulge, weaken, and ultimately rupture catastrophically. The sudden release of superheated water flashes into steam instantly, expanding 1,600 times its liquid volume and causing a massive explosion.
My valve leaks only when the water heater is heating up. Why?
This is a classic symptom of thermal expansion in a closed plumbing system. As the water is heated, it expands. Because a check valve or backflow preventer prevents water from expanding back into the municipal water system, pressure spikes inside your pipes and tank. Once it hits 150 PSI, the T&P valve drips to relieve the pressure. Installing an expansion tank resolves this.
Can I use a regular brass plug to seal the T&P valve opening if I don’t use it?
Absolutely not. You must never seal, plug, or cap this opening. The T&P valve is the most critical safety device on your water heater. Disabling it turns the tank into a pressurized vessel with no safety relief, creating a severe explosion hazard.
Why is the T&P discharge pipe required to run down near the floor?
The discharge pipe is designed to protect people. If the valve opens, it releases steam and water up to 210°F. If there is no pipe, this scalding water could spray directly into the face of anyone standing near the unit. Extending the pipe to within 6 inches of the floor directs the spray safely downward.

HowToDrainAHotWaterHeater.com
Editorial Team
We're DIY homeowners who got tired of paying plumbers $300 to turn a drain valve. Our guides are built from manufacturer documentation, plumbing code references, and real-world experience maintaining our own water heaters.