How to Flush a Water Heater (Complete Guide)
Step-by-step guide to flushing your water heater and removing sediment. Includes the vinegar method for stubborn deposits and hard water tips.
Jake Mitchell
November 30, 2024
Safety Disclaimer
Water heater maintenance involves working with pressurized systems, scalding hot water, and potentially hazardous electrical or gas connections. Always shut off power (electric heaters) or gas supply (gas heaters) and allow water to cool to a safe temperature before beginning any maintenance. Wear appropriate safety equipment including gloves and eye protection. If you're uncomfortable with any step, contact a licensed plumber.
Flushing a water heater is different from draining one, though the terms get used interchangeably. Draining empties the tank. Flushing goes further: it uses fresh water flowing through the tank to actively push out sediment while the drain valve is open. Think of it as the difference between pouring water out of a glass versus rinsing it under the tap.
If your water heater is making popping sounds, heating water more slowly than usual, or producing discolored water, sediment is likely the cause. Flushing is the fix.
Draining vs. Flushing: What’s the Difference?
Many DIY guides conflate these two tasks. Here’s the distinction:
| Task | What It Does | When to Do It |
|---|---|---|
| Draining | Empties the tank completely via the drain valve | Before maintenance, repairs, or relocation |
| Flushing | Runs fresh water through the tank while draining to dislodge and remove sediment | Annual maintenance (every 6 months in hard water areas) |
A full drain removes standing water and loose sediment. A flush goes further by using water pressure to break up compacted deposits clinging to the tank walls and bottom. For routine maintenance, flushing is what you want.
Tools and Supplies
| Tool / Supply | Purpose |
|---|---|
| Garden hose (hot water rated) | Routes flushed water to a drain |
| Flat-head screwdriver or drain valve key | Opens the drain valve |
| 5-gallon bucket | Catches water to check sediment levels |
| White distilled vinegar (2 gallons) | Dissolves stubborn mineral buildup (optional) |
| Work gloves and safety glasses | Personal protection |
| Adjustable pliers | For stuck valve handles |
| Towels | Cleanup around the drain area |
Safety First
The same precautions from draining apply here:
- Cut the power. Electric: breaker off. Gas: control valve to “Off” or “Pilot.”
- Let the water cool. Wait at least two hours, or run hot faucets until the water is lukewarm.
- Wear protection. Gloves and safety glasses. Sediment-heavy water can splash unexpectedly.
- Never fire up a dry element. Electric heating elements burn out in minutes if they’re not submerged.
Step-by-Step: How to Flush a Water Heater
Step 1: Cut Power and Water
Turn off the energy source (breaker or gas valve) and close the cold water inlet valve at the top of the heater.
Step 2: Connect the Hose and Start Draining
Attach a garden hose to the drain valve at the bottom of the tank. Run the other end to a floor drain, utility sink, or outside. Open a hot water faucet in the house to break the vacuum, then open the drain valve.
Let the tank drain completely. This takes 20 to 40 minutes depending on tank size.
Step 3: Flush With Cold Water
This is where flushing diverges from simple draining. Once the tank is empty or close to it:
- Leave the drain valve open.
- Turn the cold water supply back on.
- Let fresh water flow into the tank and out through the drain valve.
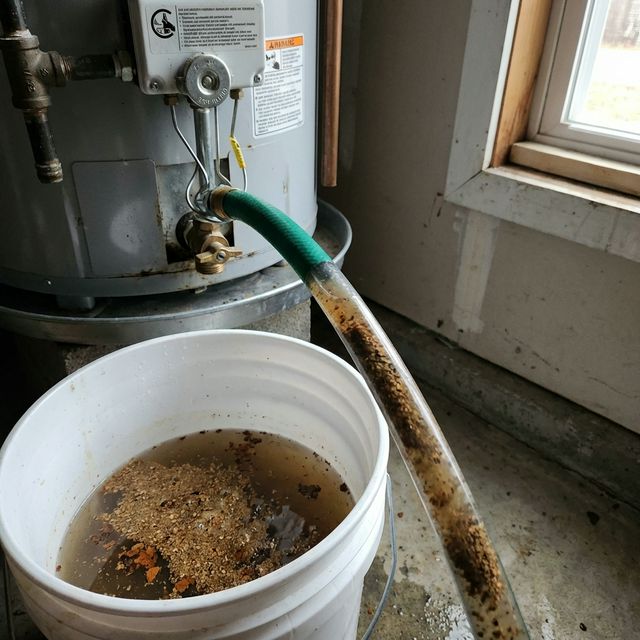
You’ll see sediment being carried out with the water. The discharge will start out cloudy or sandy and gradually clear up.
Run this for two to three minutes, then close the cold water supply. Wait for the tank to drain again. Repeat the cycle three to four times, or until the water coming from the hose runs completely clear.
Pro tip: Catch a jar of the discharge water on the first cycle and compare it to a jar from the last cycle. The visual difference shows you exactly how much sediment you removed.
Step 4: The Vinegar Method (For Stubborn Buildup)
If your water heater hasn’t been flushed in several years, or if you live in an area with very hard water, a standard flush might not be enough. Hardened mineral deposits bond to the tank walls and won’t dislodge with water pressure alone.
The vinegar soak fixes this:
- Drain the tank completely following steps 1 and 2 above.
- Close the drain valve.
- Disconnect the cold water inlet pipe from the top of the heater (you may need a pipe wrench).
- Pour 2 gallons of white distilled vinegar into the tank through the cold water opening. A funnel helps.
- Reconnect the cold water pipe hand-tight for the soaking period.
- Let the vinegar sit for 4 to 6 hours. The acetic acid dissolves calcium carbonate deposits without damaging the tank lining or anode rod.
- Drain the vinegar. Open the drain valve and let it flow out.
- Flush with fresh water using the method in Step 3, running at least four cycles to remove all vinegar residue.
This method is effective and safe. Commercial descaling products work faster, but vinegar is cheaper, non-toxic, and available at any grocery store.
Step 5: Close Up and Refill
- Close the drain valve tightly.
- Disconnect the hose.
- Open the cold water supply fully.
- Open a hot water faucet in the house and wait for a steady stream with no air sputtering.
- Close the faucet once the stream is steady.
- Restore power (breaker on, or gas valve to your desired temperature).
Step 6: Check for Leaks
Inspect the drain valve area for drips. If your drain valve has a slow leak after flushing, open and close it a few times to clear any sediment caught in the valve seat. If the drip persists, the valve may need a cap or full replacement.
Flushing Schedule: How Often Is Enough?
| Water Type | Recommended Frequency |
|---|---|
| Soft water (under 60 ppm) | Once per year |
| Moderate hardness (60-120 ppm) | Every 6-8 months |
| Hard water (120-180 ppm) | Every 6 months |
| Very hard water (over 180 ppm) | Every 4-6 months |
Not sure about your water hardness? You can buy a test strip kit at any hardware store for under five dollars. Your local water utility also publishes annual water quality reports.
Signs You Waited Too Long
These symptoms suggest heavy sediment accumulation that may need a vinegar soak or professional servicing:
- Loud popping or rumbling from the tank during heating cycles
- Rust-colored hot water from corroded tank or depleted anode rod
- Reduced hot water volume as sediment displaces usable tank space
- Longer recovery times since sediment insulates the heating element or burner
- Rotten egg smell from bacteria feeding on sediment and producing hydrogen sulfide
If you’re dealing with multiple symptoms, a standard flush might not cut it. Try the vinegar method first, or call a plumber for a professional descaling.
What About Tankless Water Heaters?
Tankless units don’t store water, so they don’t accumulate tank-bottom sediment the same way. But they do collect mineral scale inside the heat exchanger, which reduces flow rate and heating efficiency.
Descaling a tankless heater requires a different process:
- Close the inlet and outlet isolation valves.
- Connect a small submersible pump and two hoses to the service valves.
- Circulate a vinegar solution through the heat exchanger for 45 to 60 minutes.
- Flush with clean water, then reopen the isolation valves.
Most tankless manufacturers recommend descaling annually. Some units have a built-in descaling reminder that tracks water usage and alerts you when it’s time.
Frequently Asked Questions
How do I know if my water heater has sediment?
Drain a bucket of water from the drain valve. If it’s cloudy, sandy, or contains visible particles, sediment is present. Popping or rumbling noises from the tank during heating cycles are another common sign.
Can flushing damage my water heater?
No. Flushing is a standard maintenance procedure recommended by every major water heater manufacturer. The only risk is forgetting to refill the tank before turning the power back on.
How much water does flushing use?
A typical flush uses 20 to 60 gallons per cycle. For a 40-gallon tank flushed three times, expect to use around 120 gallons total.
Is vinegar safe for water heater tanks?
Yes. White distilled vinegar is a mild acid (about 5% acetic acid) that dissolves mineral deposits without attacking the steel, glass lining, or anode rod. It’s the safest descaling agent for home use.
What if the drain valve won’t open?
If the valve handle is stuck, use pliers for extra leverage. If it’s clogged internally, try tapping the valve body gently with a rubber mallet. If it’s completely seized, a plumber can replace the valve without too much difficulty.
Related Guides
- How to Drain a Hot Water Heater — Step-by-step draining instructions
- Signs Your Water Heater Needs Flushing — Warning signs to watch for
- When to Replace Your Anode Rod — Prevent tank corrosion
- Gas vs. Electric Maintenance — How flushing differs by fuel type
- Annual Maintenance Checklist — Complete yearly task list
Sources
- Rheem — How to Flush a Water Heater — Manufacturer maintenance procedures
- U.S. Department of Energy — Water Heating — Efficiency and maintenance guidance
- USGS Water Hardness Map — Regional water hardness data

Jake Mitchell
Lead Writer
Jake covers water heater maintenance and repair for HowToDrainAHotWaterHeater.com. With 30 articles published and hundreds of hours researching manufacturer documentation, plumbing codes, and community forums, he focuses on honest, practical guides built from real user experiences and verified specifications.